一、Redis简要介绍 Redis —— RE mote DI ctionary S erver,可以直接理解为远程字典服务,也就是基于Key-Value模式Memcached+Database Persistence。
如果真要把Redis与Memcached进行对比,参考下图:
使用Memcached,让我感触颇深的是Object Size的问题,由于SQL未作优化直接映射对象,导致缓存对象大于1MB,Memcached就抛了异常。而Redis默认缓存对象512MB,最大支持1GB。至少在缓存对象时,可以有更大的伸缩空间了!
此外,是数据类型。Memcached比较简单,而Redis可以支持更多复杂的数据类型,如HASH、SET、SortedSet等等。
PS:Memcached 是在Server端 实现的Sharding ,Redis 没有对应的实现,据说3.0系列开始支持。
二、安装 Redis装起来,实在是过于简单,让我几乎“无从下手”。因为连“configure”文件都不需要,你只需要做个“make”就好。
在这里下载Redis最新版 ,这里用Redis 2.4.16
下载&解压:
1
2
wget http://redis.googlecode.com/files/redis-2.4.16.tar.gz
tar zxvf redis-2.4.16.tar.gz
Redis可以解压至任何目录,一个make安装即可获得执行、配置文件。
安装(这里将redis解压到/opt/目录下):
1
2
cd /opt/redis-2.4.16
make
make之后,我们会得到以下可执行文件:
redis-server :Redis服务器的daemon启动程序redis-cli :Redis命令行操作工具。或者通过telnet进行纯文本协议操作redis-benchmark :Redis性能测试工具,测试Redis在你的系统及你的配置下的读写性能
上述文件位于src目录下。
我习惯性的执行了make install,貌似我需要的可执行文件,安装到了/usr/local/bin:
引用
1
2
3
4
5
6
7
8
9
10
11
12
13
14
15
16
17
18
19
20
21
22
23
24
25
26
27
make install
cd src && make install
make[1]: Entering directory `/opt/software/redis-2.4.16/src'
MAKE hiredis
make[2]: Entering directory `/opt/software/redis-2.4.16/deps/hiredis'
make[2]: Nothing to be done for `static'.
make[2]: Leaving directory `/opt/software/redis-2.4.16/deps/hiredis'
MAKE linenoise
make[2]: Entering directory `/opt/software/redis-2.4.16/deps/linenoise'
make[2]: “linenoise_example”是最新的。
make[2]: Leaving directory `/opt/software/redis-2.4.16/deps/linenoise'
MAKE hiredis
make[2]: Entering directory `/opt/software/redis-2.4.16/deps/hiredis'
make[2]: Nothing to be done for `static' .
make[2]: Leaving directory `/opt/software/redis-2.4.16/deps/hiredis'
LINK redis-benchmark
LINK redis-cli
Hint: To run ' make test ' is a good idea ;)
mkdir -p /usr/local/bin
cp -pf redis-server /usr/local/bin
cp -pf redis-benchmark /usr/local/bin
cp -pf redis-cli /usr/local/bin
cp -pf redis-check-dump /usr/local/bin
cp -pf redis-check-aof /usr/local/bin
make[1]: Leaving directory `/opt/software/redis-2.4.16/src'
这样,就不用我拷贝文件了。意外收获!
此外,还会得到一个默认的配置文件——redis.conf。
最好,把它拷贝到固定的目录下,例如:/etc/redis/目录下!
mkdir /etc/redis
cp redis.conf /etc/redis
然后,我们就可以在任何路径下,直接启动Redis了!
三、运行 运行Redis:
1
redis-server /etc/redis/redis.conf
引用
1
2
3
4
[1958] 13 Aug 16:18:24 * Server started, Redis version 2.4.16
[1958] 13 Aug 16:18:24
[1958] 13 Aug 16:18:24 * The server is now ready to accept connections on port 6379
[1958] 13 Aug 16:18:24 - 0 clients connected (0 slaves), 717544 bytes in use
四、测试 通过客户端命令redis-cli 访问Redis
引用 1
2
3
4
5
6
7
8
9
10
11
redis> set name zlex
OK
redis> get name
"zlex"
```
&
```bash
redis-benchmark -l
这个测试会一直进行下去,直到你Ctrl+C:
1
2
3
4
5
6
7
8
9
10
11
12
13
14
15
16
17
18
19
20
21
22
23
24
25
26
27
28
29
30
31
32
33
34
====== PING (inline) ======
10000 requests completed in 0.12 seconds
50 parallel clients
3 bytes payload
keep alive: 1
99.31% <= 1 milliseconds
99.53% <= 2 milliseconds
99.64% <= 3 milliseconds
99.70% <= 4 milliseconds
99.74% <= 5 milliseconds
99.78% <= 6 milliseconds
99.82% <= 7 milliseconds
99.84% <= 8 milliseconds
99.86% <= 9 milliseconds
99.89% <= 10 milliseconds
99.91% <= 11 milliseconds
99.93% <= 12 milliseconds
99.96% <= 13 milliseconds
99.98% <= 14 milliseconds
100.00% <= 15 milliseconds
81300.81 requests per second
====== PING ======
10000 requests completed in 0.12 seconds
50 parallel clients
3 bytes payload
keep alive: 1
99.96% <= 1 milliseconds
100.00% <= 1 milliseconds
84033.61 requests per second
^CET (10 keys): 26200.00
五、关闭 也可通过客户端命令redis-cli 完成Redis 关闭操作:
引用 1
2
3
4
5
6
7
8
9
10
11
12
13
14
[2639] 13 Aug 16:35:35
[2639] 13 Aug 16:35:35 * Saving the final RDB snapshot before exiting.
[2639] 13 Aug 16:36:49 * DB saved on disk
[2639] 13 Aug 16:36:49
```
&
```bash
[1958] 13 Aug 16:18:24
需要修改/etc/sysctl.conf 文件:
末尾追加vm.overcommit_memory = 1
然后执行sysctl vm.overcommit_memory=1 ,使之生效:
1
2
sysctl vm.overcommit_memory=1
vm.overcommit_memory = 1
2./proc/sys/vm/overcommit_memory 为了调整内存分配策略,需要配置/proc/sys/vm/overcommit_memory
0, 表示内核将检查是否有足够的可用内存供应用进程使用;如果有足够的可用内存,内存申请允许;否则,内存申请失败,并把错误返回给应用进程。
1, 表示内核允许分配所有的物理内存,而不管当前的内存状态如何。
2, 表示内核允许分配超过所有物理内存和交换空间总和的内存
默认为0,如果内存情况比较紧张的话,设为1:
1
echo 1 > /proc/sys/vm/overcommit_memory
3.redis.conf 前面启动Redis后,总是在命令行里不断跳着各种日志,很麻烦。即便通过“&”,领其后台运行,也无济于事。这就需要修改redis.conf ,以Daemo模式运行!
redis.conf 参数:
daemonize:是否以后台daemon方式运行
pidfile:pid文件位置
port:监听的端口号
timeout:请求超时时间
loglevel:log信息级别
logfile:log文件位置
databases:开启数据库的数量
save :保存快照的频率,第一个表示多长时间(秒级),第三个 表示执行多少次写操作。在一定时间内执行一定数量的写操作时,自动保存快照。可设置多个条件。
rdbcompression:是否使用压缩
dbfilename:数据快照文件名(只是文件名,不包括目录)
dir:数据快照的保存目录(这个是目录)
appendonly:是否开启appendonlylog,开启的话每次写操作会记一条log,这会提高数据抗风险能力,但影响效率。
appendfsync:appendonlylog如何同步到磁盘(三个选项,分别是每次写都强制调用fsync、每秒启用一次fsync、不调用fsync等待系统自己同步)
slaveof :主从配置,在redis-slave上配置master的ip port,即可。
例如,我们可以修改为如下方式:
引用 1
2
3
daemonize yes
save 60 1000
maxmemory 256mb
PS:切记,一定要设定maxmemmory,且配置大小要小于物理内存,留有足够的内存供系统使用。
公司一同学的Redis,某期间数据暴涨,导致内存吃紧,SWAP加剧,直接宕机。就是因为没有设置maxmemmory 。
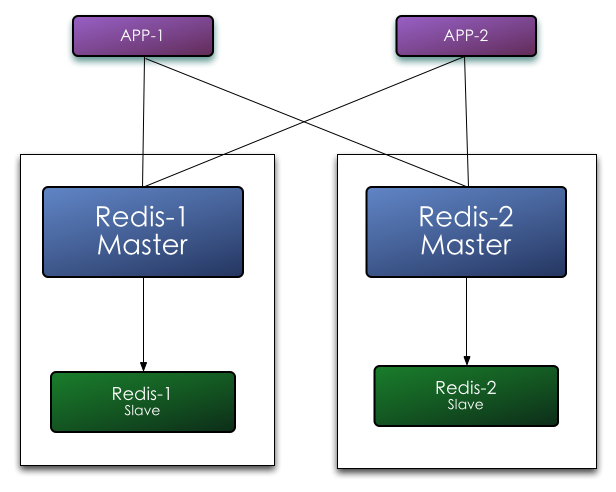
七、集群配置 把鸡蛋都放在一个篮子里是件危险的事情。首先,要做好主备。其次,如果可以做一致性哈希,可以起到负载均衡的作用。
配置Master-Slave,只需要在Slave上配置Master节点IP Port:
这里的Master IP 为192.168.133.139 端口位6379,配置redis.conf:
1
slaveof 192.168.133.139 6379
PS:为了两个Redis Server可以互访,需要注释掉bind 127.0.0.1
依次启动Master,Slave:
Master 1
2
3
4
5
6
7
8
9
10
11
12
13
14
15
16
17
18
19
20
21
22
23
24
25
26
27
28
29
30
31
32
33
34
35
36
37
38
39
40
41
42
43
44
45
46
47
48
49
50
[7651] 17 Aug 19:08:07 * Server started, Redis version 2.4.16
[7651] 17 Aug 19:08:07 * DB loaded from disk: 0 seconds
[7651] 17 Aug 19:08:07 * The server is now ready to accept connections on port 6379
[7651] 17 Aug 19:08:08 * Slave ask for synchronization
[7651] 17 Aug 19:08:08 * Starting BGSAVE for SYNC
[7651] 17 Aug 19:08:08 * Background saving started by pid 7652
[7652] 17 Aug 19:08:08 * DB saved on disk
[7651] 17 Aug 19:08:08 * Background saving terminated with success
[7651] 17 Aug 19:08:08 * Synchronization with slave succeeded
```
```bash
[7572] 17 Aug 19:07:39 * Server started, Redis version 2.4.16
[7572] 17 Aug 19:07:39 * DB loaded from disk: 0 seconds
[7572] 17 Aug 19:07:39 * The server is now ready to accept connections on port 6379
[7572] 17 Aug 19:07:39 * Connecting to MASTER...
[7572] 17 Aug 19:08:08 * MASTER <-> SLAVE sync started: SYNC sent
[7572] 17 Aug 19:08:08 * MASTER <-> SLAVE sync: receiving 10 bytes from master
[7572] 17 Aug 19:08:08 * MASTER <-> SLAVE sync: Loading DB in memory
[7572] 17 Aug 19:08:08 * MASTER <-> SLAVE sync: Finished with success
```
&
&
```bash
telnet 192.168.133.139 6379
Trying 192.168.133.139...
Connected to 192.168.133.139.
Escape character is '^]' .
set name snowolf
+OK
```
```bash
telnet 192.168.133.140 6379
Trying 192.168.133.140...
Connected to 192.168.133.140.
Escape character is '^]' .
get name
$7
snowolf
搞定!
八、主从备份 在从服务器上执行下列命令:
1
2
3
4
5
redis-cli save
redis-cli shutdown
然后,拷贝数据目录下的rdb文件。
九、系统服务 习惯了通过service启动一切服务,当然,这跟我生产环境部署有关,通常只分配给用于部署的账户操作service命令的权限。主要是为了确保系统安全。
参考之前写的Memcached的系统服务文件,改造一个Redis版本!
新建文件,并赋予权限:
1
2
3
4
5
6
7
8
9
10
11
12
13
14
15
16
17
18
19
20
21
22
23
24
25
26
27
28
29
30
31
32
33
34
35
36
37
38
39
40
41
42
43
44
45
46
47
48
49
50
51
52
53
54
55
56
57
58
59
60
61
62
63
64
65
66
67
68
69
70
71
72
73
74
75
76
77
78
79
80
81
82
83
84
85
86
87
88
89
90
91
92
93
94
95
96
97
touch /etc/init.d/redis-server
chmod +x /etc/init.d/redis-server
```
&
```bash
#!/bin/bash
redis_path="/usr/local/bin/redis-server"
redis_conf="/etc/redis/redis.conf"
redis_pid="/var/run/redis.pid"
. /etc/rc.d/init.d/functions
[ -x $redis_path ] || exit 0
RETVAL=0
prog="redis"
start
if [ -e $redis_pid -a ! -z $redis_pid ];then
echo $prog " already running...."
exit 1
fi
echo -n $"Starting $prog "
$redis_path $redis_conf
RETVAL=$?
[ $RETVAL -eq 0 ] && {
touch /var/lock/subsys/$prog
success $"$prog "
}
echo
return $RETVAL
}
stop
echo -n $"Stopping $prog "
killproc -d 10 $redis_path
echo
[ $RETVAL = 0 ] && rm -f $redis_pid /var/lock/subsys/$prog
RETVAL=$?
return $RETVAL
}
case "$1 " in
start)
start
;;
stop)
stop
;;
status)
status $prog
RETVAL=$?
;;
restart)
stop
start
;;
condrestart)
if test "x`pidof redis`" != x; then
stop
start
fi
;;
*)
echo $"Usage: $0 {start|stop|status|restart|condrestart}"
exit 1
esac
exit $RETVAL
```
```bash
Stopping redis [失败]
Starting redis [确定]
redis (pid 14965) 正在运行...
非常方便!